1 views
実現する機能
自宅にメールサーバーを構築するのは、受信だけなら問題ないのですが、送信するとなると困難です。危いメール扱いされるので、どこのメールサーバーも着信を拒否するからです。
こういう現状でも自宅にメールサーバーを構築するメリットは、
フリーメールだと身元を怪しまれる
添付ファイルの制限も大幅に緩和できる
yahoo、gmail、レンタルサーバーに送られた自分宛のメールすべてを自宅サーバーに転送させて一度に確認できる
ことです。
構築するサーバーは、送信メールサーバー(SMTPサーバー)と受信メールサーバー(POP/IMAPサーバー)です。送信メールサーバーにはPostfix、受信メールサーバーにはDovecotを採用しています。
自宅のメールサーバーは、SMTP-Auth機能を構築してインターネットでメールを送信しています。
※SMTP-Auth機能とは、メール送信時にインターネットプロバイダのユーザ名とパスワードで認証を行なう機能で、迷惑メールの不正中継に利用されないためのものです。softbank光をプロバイダで使っていますが、SMTP-Auth機能が使えなかったので、Gmailを使って外部へメール送信できるようにしています。
以下は、その備忘録です。
事前準備(下記サイトで確認のこと)
Postfixの導入手順
TeraTermでコマンドを使う方法を理解しておくこと。以下の記述ではTeraTerm画面を表示しています。紫色はキーボードから入力するコマンド(コピペした方が楽ですが、コマンドは覚えられません)、緑はコマンドや処理内容の説明、白は自動表示する部分、赤は注意書きです。tuは私のユーザー名、topi.0t0.jpは私のドメイン名ですので、ご自分のものに置き換えて設定してください。
(1)Postfix設定
#Postfix設定ファイル編集。インストールが必要なら yum -y install postfix
[root@e4vlm0ra ~]# vi /etc/postfix/main.cf
# INTERNET HOST AND DOMAIN NAMES
#…
#myhostname = host.domain.tld
#myhostname = virtual.domain.tld
#追加(自FQDN名を指定)
myhostname = topi.0t0.jp
# The mydomain parameter specifies the local internet domain name.
# The default is to use $myhostname minus the first component.
# …
#mydomain = domain.tld
#追加(自ドメイン名を指定)
mydomain = topi.0t0.jp
# SENDING MAIL
#…
#myorigin = $myhostname
#行頭の#を削除。ローカルからのメール送信時@以降にドメイン名を付加
myorigin = $mydomain
# RECEIVING MAIL
#…
#行頭の#を削除(外部からのメール受信を許可)
inet_interfaces = all
#inet_interfaces = $myhostname
#inet_interfaces = $myhostname, localhostl
#外部からのメール受信を許可するので行頭に#を付加
#inet_interfaces = localhost
# STANDARD_CONFIGURATION_README).
#…
#自ドメイン宛メールを受信するので行頭に#を付加
#mydestination = $myhostname, localhost.$mydomain, localhost
#行頭の#を削除(自ドメイン宛メールを受信できるようにする)
mydestination = $myhostname, localhost.$mydomain, localhost, $mydomain
#mydestination = $myhostname, localhost.$mydomain, localhost, $mydomain,
# mail.$mydomain, www.$mydomain, ftp.$mydomain
# DELIVERY TO MAILBOX
#…
#home_mailbox = Mailbox
#行頭の#を削除(メールボックス形式をMaildir形式にする)
home_mailbox = Maildir/
# SHOW SOFTWARE VERSION OR NOT
#…
#smtpd_banner = $myhostname ESMTP $mail_name
#smtpd_banner = $myhostname ESMTP $mail_name ($mail_version)
#追加(メールサーバーソフト名の隠蔽化)
smtpd_banner = $myhostname ESMTP unknown
#以下を最終行へ追加(SMTP-Auth設定)
smtpd_sasl_auth_enable = yes
smtpd_sasl_local_domain = $myhostname
smtpd_recipient_restrictions =
permit_mynetworks
permit_sasl_authenticated
reject_unauth_destination
#postfix再起動
[root@e4vlm0ra ~]# systemctl restart postfix
#postfix自動起動設定
[root@e4vlm0ra ~]# systemctl enable postfix |
(2)SMTP-Auth設定
SMTP-Auth用ユーザ名、パスワードにシステムのユーザ名、パスワードを使用します。
#saslauthd Install
[root@e4vlm0ra ~]# yum install cyrus-sasl cyrus-sasl-plain
インストール:
dovecot.x86_64 1:2.2.10-8.el7
依存性関連をインストールしました:
clucene-core.x86_64 0:2.3.3.4-11.el7
完了しました!
#saslauthd起動
[root@e4vlm0ra ~]# systemctl start saslauthd
#saslauthd自動起動設定
[root@e4vlm0ra ~]# systemctl enable saslauthd
ln -s ‘/usr/lib/systemd/system/saslauthd.service’ ‘/etc/systemd/system/multi-user.target.wants/saslauthd.service’
#postfix再起動
[root@e4vlm0ra ~]# systemctl restart postfix |
Dovecotの導入手順
(1)Dovecotインストール
#Dovecotインストール
[root@e4vlm0ra ~]# yum -y install dovecot
インストール:
dovecot.x86_64 1:2.2.10-4.el7_0.1
完了しました!
#dovecot.confの設定
[root@e4vlm0ra ~]# vi /etc/dovecot/dovecot.conf
# A comma separated list of IPs or hosts where to listen in for connections.
# “*” listens in all IPv4 interfaces, “::” listens in all IPv6 interfaces.
# If you want to specify non-default ports or anything more complex,
# edit conf.d/master.conf.
#listen = *, ::
#追記。IPv6を無効化
listen = *
#10-auth.confの設定
[root@e4vlm0ra ~]# vi /etc/dovecot/conf.d/10-auth.conf
# Disable LOGIN command and all other plaintext authentications unless
# SSL/TLS is used (LOGINDISABLED capability). Note that if the remote IP
# matches the local IP (ie. you’re connecting from the same computer), the
# connection is considered secure and plaintext authentication is allowed.
# See also ssl=required setting.
#disable_plaintext_auth = yes
#追記。プレーンテキスト認証も許可
disable_plaintext_auth = no
# Space separated list of wanted authentication mechanisms:
# plain login digest-md5 cram-md5 ntlm rpa apop anonymous gssapi otp skey
# gss-spnego
# NOTE: See also disable_plaintext_auth setting.
#ログイン認証も許可
auth_mechanisms = plain login
#10-ssl.confの設定(sslの設定がまだならこちら)
[root@e4vlm0ra ~]# vi /etc/dovecot/conf.d/10-ssl.conf
##…
# SSL/TLS support: yes, no, required.
# disable plain pop3 and imap, allowed are only pop3+TLS, pop3s, imap+TLS and imaps
# plain imap and pop3 are still allowed for local connections
#行頭に#を付加
#ssl = required
#sslを許可
ssl = yes
…
…
# PEM encoded X.509 SSL/TLS certificate and private key. They’re opened before
# dropping root privileges, so keep the key file unreadable by anyone but
# root. Included doc/mkcert.sh can be used to easily generate self-signed
# certificate, just make sure to update the domains in dovecot-openssl.cnf
#行頭に#を付加
#ssl_cert = </etc/pki/dovecot/certs/dovecot.pem
#行頭に#を付加
#ssl_key = </etc/pki/dovecot/private/dovecot.pem
#server.crtの場所を明示
ssl_cert =</etc/letsencrypt/live/topi.0t0.jp/fullchain.pem
#server.keyの場所を明示
ssl_key = </etc/letsencrypt/live/topi.0t0.jp/privkey.pem
#10-mail.confの設定
[root@e4vlm0ra ~]# vi /etc/dovecot/conf.d/10-mail.conf
# See doc/wiki/Variables.txt for full list. Some examples:
#
# mail_location = maildir:~/Maildir
# mail_location = mbox:~/mail:INBOX=/var/mail/%u
# mail_location = mbox:/var/mail/%d/%1n/%n:INDEX=/var/indexes/%d/%1n/%n
#
#
#
#mail_location =
#メールボックス形式をMaildir形式に
mail_location = maildir:~/Maildir
#10-master.confの設定
[root@e4vlm0ra ~]# vi /etc/dovecot/conf.d/10-master.conf
# Postfix smtp-auth
#unix_listener /var/spool/postfix/private/auth {
# mode = 0666
#}
unix_listener /var/spool/postfix/private/auth {
mode = 0666
#追記
user = postfix
#追記
group = postfix
}
#Dovecot起動
[root@e4vlm0ra ~]# systemctl start dovecot
#Dovecot自動起動設定
[root@e4vlm0ra ~]# systemctl enable dovecot
ln -s ‘/usr/lib/systemd/system/dovecot.service’ ‘/etc/systemd/system/multi-user.target.wants/dovecot.service’ |
OP25B対策(SMTP-Auth機能)
(1)Postfix設定
#main.cfの編集
[root@e4vlm0ra ~]# vi /etc/postfix/main.cf
#最下行に追記 (cert、keyファイルは自身が取得した証明書に置き換え)
smtpd_use_tls = yes
smtp_tls_mandatory_protocols = !SSLv2, !SSLv3
smtpd_tls_mandatory_protocols = !SSLv2, !SSLv3
smtpd_tls_cert_file = /etc/letsencrypt/live/topi.0t0.jp/fullchain.pem
smtpd_tls_key_file = /etc/letsencrypt/live/topi.0t0.jp/privkey.pem
smtpd_tls_session_cache_database = btree:/etc/postfix/smtpd_scache
#master.cfの編集
[root@e4vlm0ra ~]# vi /etc/postfix/master.cf
# ==========================================================================
# service type private unpriv chroot wakeup maxproc command + args
# (yes) (yes) (yes) (never) (100)
# ==========================================================================
#以下のこの色の#を削除する
smtp inet n – n – – smtpd
#smtp inet n – n – 1 postscreen
#smtpd pass – – n – – smtpd
#dnsblog unix – – n – 0 dnsblog
#tlsproxy unix – – n – 0 tlsproxy
#submission inet n – n – – smtpd
#-o syslog_name=postfix/submission
# -o smtpd_tls_security_level=encrypt
#-o smtpd_sasl_auth_enable=yessmtp inet n – n – – smtpd
# …
#submission inet n – n – – smtpd
#-o syslog_name=postfix/submission
# -o smtpd_tls_security_level=encrypt
#-o smtpd_sasl_auth_enable=yes
# …
#smtps inet n – n – – smtpd
#-o syslog_name=postfix/smtps
#-o smtpd_tls_wrappermode=yes
#-o smtpd_sasl_auth_enable=yes |
(2)SMTP認証情報設定
#GmailのSMTP認証情報設定
[root@ ~]# echo [smtp.gmail.com]:587 your-user-name@gmail.com:your-password > /etc/postfix/sasl_passwd
smtp.gmail.com・・・SMTPサーバー名
your-user-name・・・あなたのGmailアカウント名
your-password・・・あなたのGmailアカウントのパスワード。二段階認証を
している場合には、別途パスワードの生成が必要で、以下の三つのコマンドも
再度実行させること
#root以外書き込みできないようにパーミッション変更
[root@ ~]# chmod 640 /etc/postfix/sasl_passwd
#sasl_passwd.db作成
[root@ ~]# postmap /etc/postfix/sasl_passwd
#Gmailのsmtpサーバーを利用
[root@e4vlm0ra ~]# vi /etc/postfix/main.cf
以下を最終行へ追記(「topi.0t0.jp」は例示)
relayhost = [smtp.gmail.com]:587
smtp_use_tls = yes
smtp_sasl_auth_enable = yes
smtp_sasl_password_maps = hash:/etc/postfix/sasl_passwd
smtp_sasl_tls_security_options = noanonymous
smtp_sasl_mechanism_filter = plain
smtp_tls_CApath = /etc/pki/tls/certs/ca-bundle.crt
#あなたのMailServer名。myhostnameとして設定してあれば記述不要
smtp_helo_name = topi.0t0.jp
#Postfix設定反映
[root@ ~]# systemctl restart postfix |
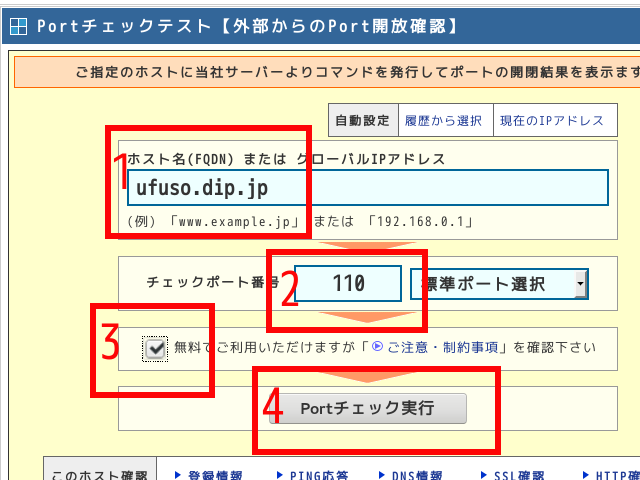
(3)ポート993番(IMAPの場合)等のOPEN確認
※注意1VPSの設定でポートは開けていること
※注意2CentOS7.4インストール後の初期設定でファイアーウオールは無効にしてあること
a ここをクリックして、下図の画面を表示させ、赤枠1に構築したメールサーバーのドメイン名を入力し、赤枠2にポート番号「993」を入力して、赤枠3にチェックを入れ、赤枠4の「Portチェック実行」をクリック。
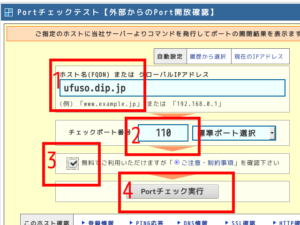
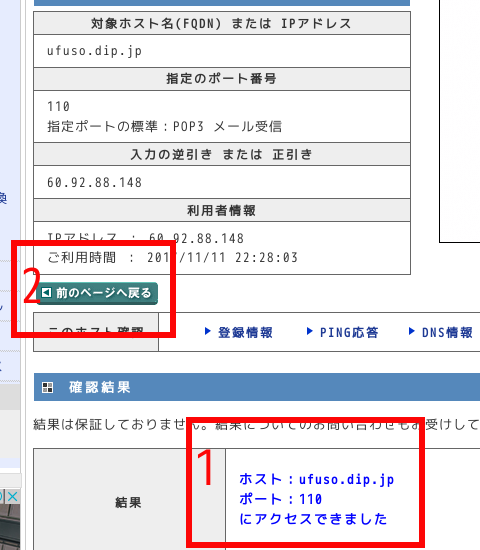
b 赤枠1でアクセスできていることを確認して、赤枠2の「前のページへ戻る」をクリック。

465番(SMTPS:送信)、587番(OP25対策)、25番(SMTP:送信)、143(IMAP:受信)も開放されていることを確認のこと。
(4)メールの送信テスト
topi.0t0.jpでメールを送っても、gmailアドレスで相手に送信される問題は残るが、まずは送信できるか確認する。
#メールできるかをテストするため、mailxをインストール。
[root@e4vlm0ra ~]# yum -y install mailx
インストール済み:
mailx-12.5-29.el8.x86_64
完了しました!
#メールできるかをテスト。自分のヤフーメール宛てに送信してみた。
[root@e4vlm0ra ~]# echo “ここにメールの本文を入力” | mail -s “ここにメールのタイトルを入力” xxx@yahoo.co.jp
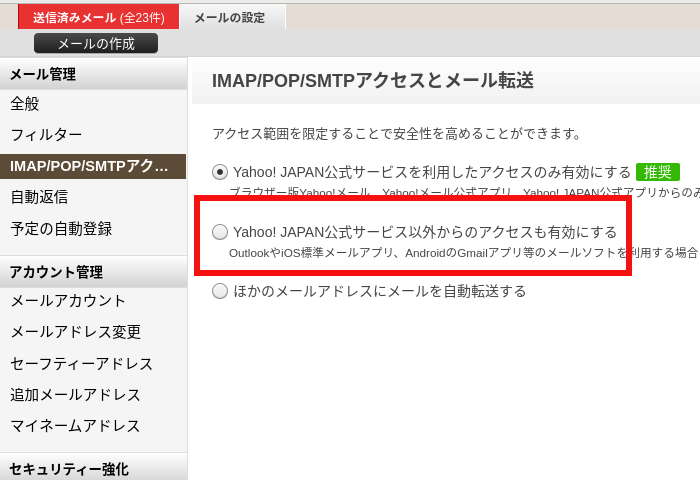
#ヤフーメールで受信できていれば成功。
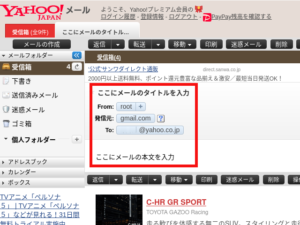
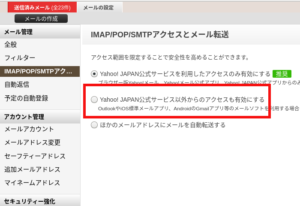
#ヤフーメールは管理が厳しいので、設定を赤枠に変更しないと受信できないのでご注意を。
 |
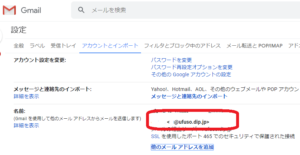
(5)Gmailアドレスではなく、自社のアドレスでメールを送信する方法の設定
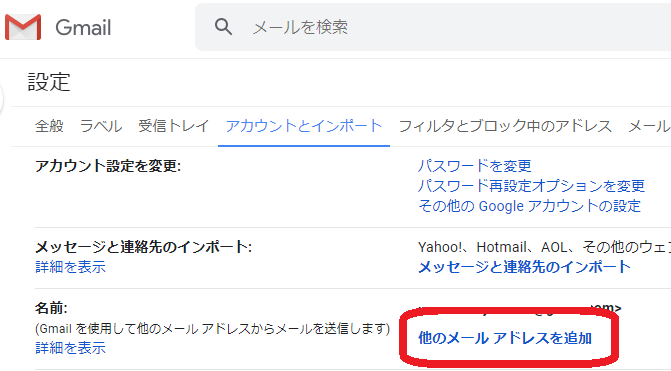
(イ)ここをクリックして自分のGmailを開き、画面右上にある赤枠1の歯車のアイコンをクリックし、表示される一覧から赤枠2の「設定」をクリック

(ロ)赤枠の「アカウントとインポート」をクリック

(ハ)赤枠の「他のメールアドレスを追加」をクリック
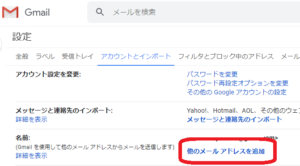
(ニ)赤枠1に自宅メールサーバーで使っている自分のメールアドレスを入力し、「エイリアスとして使います。」のチェックを外し、赤枠2の「次のステップ」をクリック。名前欄には、あなたのGmailに登録した名前が表示されます

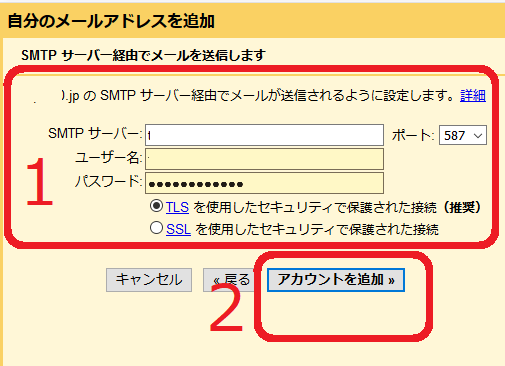
(ホ)赤枠1に自宅のSMTPサーバー名、自宅サーバー上のあなたのユーザー名とパスワードを入力し、ポート番号は587を選択して、赤枠2の「アカウントを追加」をクリック

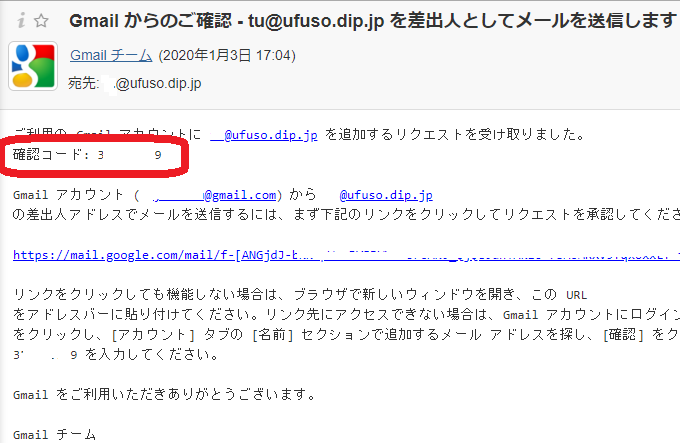
(ヘ)登録したメールアドレス宛に「確認コード」とリンク先が送られてくるので、コードをメモるかリンク先をクリック

(ト)赤枠1に従いリンク先をクリックするか、赤枠2に従い確認コードを入力して「確認」をクリックする

(チ)赤枠に送信に使ったメールアドレスが表示されていれば成功
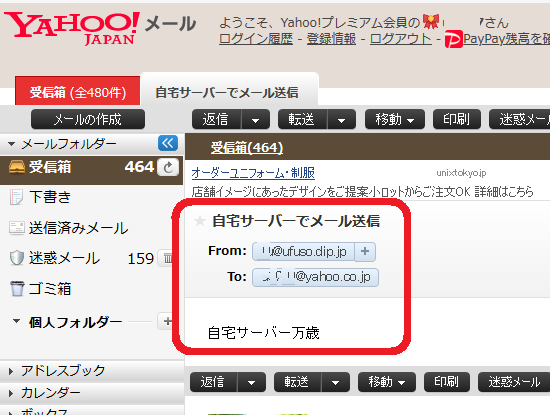
(6)再度メールの送信テスト
topi.0t0.jpアドレスで相手に送信できるか確認する。
#メールできるかをテスト。自分のヤフーメール宛てに送信してみた。
[root@e4vlm0ra ~]# echo “自宅サーバー万歳” | mail -s “自宅サーバーでメール送信” -r xx@topi.0t0.jp xx@yahoo.co.jp
#ヤフーメールで受信できていれば成功。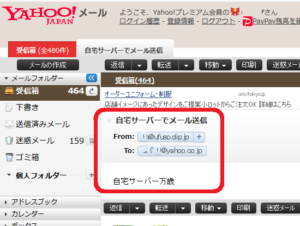
以上 |


コメントを残す