実現する機能
自宅サーバーでWordPressを使っているため、FTPサーバーがなければテーマやプラグインのインストールもアップデートもできません。そこで、Vsftpdを導入して、インストールやアップデートができるようにしました。レンタルサーバーならこんな苦労は無いのですが、SSLでID&パスワードの暗号化通信ができたりするので自宅サーバーでも安心です。
Vsftpdの導入手順
(1)Vsftpdのインストール
[root@ufuso ~]#yum -y install vsftpd ← vsftpdのインストール インストール: vsftpd.x86_64 0:3.0.2-9.el7 完了しました! |
(2)Vsftpdの設定
[root@ufuso ~]#vi /etc/vsftpd/vsftpd.conf ← Vsftpdファイルの設定 # Allow anonymous FTP? (Beware - allowed by default if you comment this out). anonymous_enable=NO ← YESをNOに変更して匿名利用ーの禁止 # By default the server will pretend to allow ASCII mode but in fact ignore # the request. Turn on the below options to have the server actually do ASCII # mangling on files when in ASCII mode. # Beware that on some FTP servers, ASCII support allows a denial of service # attack (DoS) via the command "SIZE /big/file" in ASCII mode. vsftpd # predicted this attack and has always been safe, reporting the size of the # raw file. # ASCII mangling is a horrible feature of the protocol. ascii_upload_enable=YES ← 行頭の#を削除して、アスキーモードでのアップロード を許可 ascii_download_enable=YES ← 行頭の#を削除して、アスキーモードでのダウンロード を許可 # You may specify an explicit list of local users to chroot() to their home # directory. If chroot_local_user is YES, then this list becomes a list of # users to NOT chroot(). # (Warning! chroot'ing can be very dangerous. If using chroot, make sure that # the user does not have write access to the top level directory within the # chroot) chroot_local_user=YES ← 行頭の#を削除して、ディレクトリより上層へ行けるユー ザーを制限 chroot_list_enable=YES ← 行頭の#を削除して、ディレクトリより上層へ行けるユー ザーリスト使用 # (default follows) chroot_list_file=/etc/vsftpd/chroot_list ← 行頭の#を削除して、許可ユーザーの リストファイル指定 # # You may activate the "-R" option to the builtin ls. This is disabled by # default to avoid remote users being able to cause excessive I/O on large # sites. However, some broken FTP clients such as "ncftp" and "mirror" assume # the presence of the "-R" option, so there is a strong case for enabling it. ls_recurse_enable=YES ← 行頭の#を削除して、ディレクトリ単位での一括転送を許可 local_root=public_html ← 追記して、ホームディレクトリを /var/www/public_htmlとし、wwwより上層には行けないよう設定 use_localtime=YES ← 追記して、タイムスタンプに日本時間を使う [root@ufuso ~]# vi /etc/vsftpd/chroot_list ← 上層アクセスユーザーリストの作成 tu ← 上層アクセスユーザーに自分のユーザー名のみ登録 [root@ufuso ~]# systemctl start vsftpd ← Vsftpdの起動 [root@ufuso ~]# systemctl enable vsftpd ← Vsftpdの自動起動設定 ln -s '/usr/lib/systemd/system/vsftpd.service' '/etc/systemd/system/multi-user.target.wants/vsftpd.service' |
(3)SSL/TSLの設定
[root@ufuso ~]#cd /etc/pki/tls/certs ← certsディレクトリへ移動

[root@ufuso certs]# openssl req -x509 -nodes -newkey rsa:1024 -keyout /etc/pki/tls/certs/vsftpd.pem -out /etc/pki/tls/certs/vsftpd.pem
 ← サーバー証明書の作成
Generating a 1024 bit RSA private key
........................++++++
.....++++++
writing new private key to '/etc/pki/tls/certs/vsftpd.pem'
-----
You are about to be asked to enter information that will be incorporated
into your certificate request.
What you are about to enter is what is called a Distinguished Name or a DN.
There are quite a few fields but you can leave some blank
For some fields there will be a default value,
If you enter '.', the field will be left blank.
-----
Country Name (2 letter code) [XX]:JP ← サーバーのある国名を入力してエンター
・キーを押す(以下同じ)
State or Province Name (full name) []:Okinawa ← 都道府県名
Locality Name (eg, city) [Default City]:Naha ← 市区町村名
Organization Name (eg, company) [Default Company Ltd]:ShikakiraCS ← 組織名
(ホスト名も可)
Organizational Unit Name (eg, section) []: ← 部課名(無入力もOK)
Common Name (eg, your name or your server's hostname) []:ufuso.dip.jp ← ホスト
名
Email Address []:tu@ufuso.dip.jp ← 障害時等の連絡先メールアドレス

[root@ufuso certs]# chmod 600 vsftpd.pem ← ファイルへの外部アクセス禁止

[root@ufuso certs]#  vi /etc/vsftpd/vsftpd.conf ← vsftpdファイルに設定追加
 以下を最終行に追記
rsa_cert_file=/etc/pki/tls/certs/vsftpd.pem ← サーバー証明書を指定
ssl_enable=YES ← SSLの有効化
force_local_data_ssl=NO ← 通信のSSL使用を強制しない
force_local_logins_ssl=NO ← ユーザー認証のSSL使用を強制しない

※SSL使用を強制するとWordPressで「wp-contentディレクトリが見つかりません」
というエラーが出る

[root@ufuso certs]# systemctl restart vsftpd ← vsftpdの再起動

[root@ufuso ~]# setsebool -P allow_ftpd_full_access 1 ← SELinuxが有効な場合
には、フルアクセス許可を設定
|
(4)動作確認のためにWordPressでテーマをアップデート
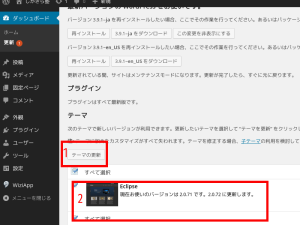
「ダッシュボード」画面を開くと、赤枠2のテーマの更新があったので、赤枠1の「テーマの更新」をクリックして、動作確認をしてみました。

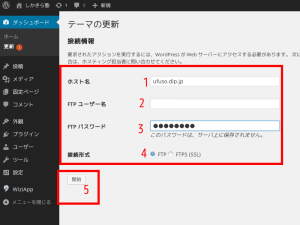
赤枠1のホスト名。2のユーザー名、3のパスワードを入力して赤枠4の「FTP」にチェックを入れ、赤枠5の「開始」をクリックすると

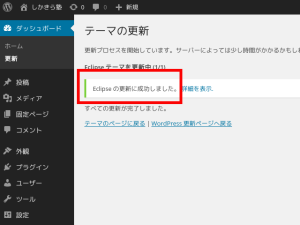
赤枠の「成功しました」の表示が出たので、動作確認OKです。

コメントを残す